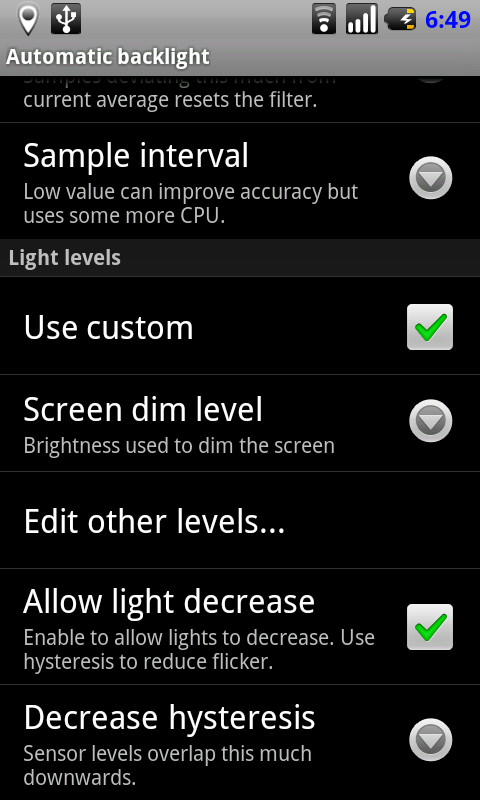
(1)First of all, check “Use custom” in the light levels section. It causes us to be able to adjust the light sensor level and the brightness of the screen in the “Edit other levels…” menu.
(2)Next, check “Allow light decrease”. It allows for decreasing the brightness of the screen when you move from a bright place to a dark place.
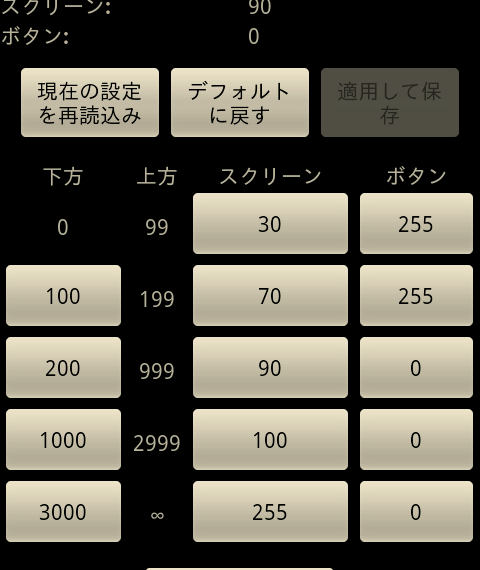
(3)The light sensor level and the brightness of the screen are set by “Edit other levels…”.
In the “Edit other levels…” setting screen, the current sensor value, the brightness of the screen (0-255), and the backlight levels of the button (0-255) are displayed in the upper part of the screen. The sensor value is a value of lux. It’s about 600 lux in an office, 1000 lux near a window, and over 10000 lux outside on a sunny day. I will explain the filtered/raw sensor value later.
You can set the range of the sensor values, and the brightness level of the screen and the button in the range by 0-255. In the example picture, the screen brightness is 90 and the button brightness is 0 (no lighting) at a range of 250 lux – 999 lux in the sensor value.
(4)Check “Decrease hysteresis” if necessary.
It prevents the brightness of the screen from going down rapidly. Even if the level of the sensor value falls to another range, if the value is upper than a threshold decided by a value of “Decrease hysteresis”, the brightness of the screen is not changed.
For example, when the sensor level is changed from 10240 lux to 1280 lux, the brightness of the screen is changed to 255→ 100, because it changes from one range where the sensor value of 10240 lux is into the range where 1280 lux is in. However, if the changed light sensor value is upper than a threshold decided by decreasing a “Decrease hysteresis” rate (ex. 90%) of a range (2999-1000=1999) from an upper value of the range (ex. 2999 lux), the screen brightness isn’t changed. In this case, the threshold is 2999 lux – (2999-1000)*90%= 1200 lux.
Therefore, the brightness level changes from 255 to 100 at 80% of “Decreased hysteresis” (Because the threshold becomes 1400 lux) while it is still 255 at 90% of “Decreased hysteresis” by the above-mentioned example.
(5)Finally, check “Enabled” at the Light sensor filter if necessary
This filter also prevents the screen brightness from changing suddenly. The sensor value sampled by “Sample interval” (ex: 1 sec.) in the “Window length” (ex: 30 sec.) is averaged, and it is assumed the filtered sensor value. As a result, the sensor value doesn’t change rapidly.