Customize Consent Preferences

We use cookies to help you navigate efficiently and perform certain functions. You will find detailed information about all cookies under each consent category below.

The cookies that are categorized as "Necessary" are stored on your browser as they are essential for enabling the basic functionalities of the site. ... 

Always Active

Necessary cookies are required to enable the basic features of this site, such as providing secure log-in or adjusting your consent preferences. These cookies do not store any personally identifiable data.

No cookies to display.

Functional cookies help perform certain functionalities like sharing the content of the website on social media platforms, collecting feedback, and other third-party features.

No cookies to display.

Analytical cookies are used to understand how visitors interact with the website. These cookies help provide information on metrics such as the number of visitors, bounce rate, traffic source, etc.

No cookies to display.

Performance cookies are used to understand and analyze the key performance indexes of the website which helps in delivering a better user experience for the visitors.

No cookies to display.

Advertisement cookies are used to provide visitors with customized advertisements based on the pages you visited previously and to analyze the effectiveness of the ad campaigns.

No cookies to display.

PPSを使ったNTPサーバのためのカーネル設定

この記事はかなり昔のものです。最近のカーネルは最初からPPS対応になっており、カーネルの作り直しはしないでそのまま使えます。精度はオフセットが±20μsの範囲に収まる程度です。

=============================================================================================

Raspberry Pi を使って Stratum-1 NTPサーバを動かしています。

GPSのPPS信号を使った Stratum-1 NTPサーバの作り方

この記事のコメント欄で”のべろ”さんという人に教わったのですが、PPS用のカーネル設定がまだ不完全でした。教わった通りやってみると、なんと精度が20倍くらい高くなりました。

Tickless System をOFFにするとよいとのことで以下のページを教わりました。

http://bugs.ntp.org/show_bug.cgi?id=2314

PPSとカーネルの設定について調べてみるといくつか参考になるページが見つかりました。カーネルのバージョンが3.10だとちょっとConfigurationの仕方が異なるようです。以下のページが参考になります。

Raspberry Pi, GPS and NTP

以下のようにカーネルの設定をします。

$ sudo make menuconfig を実行してカーネルコンフィギュレーションメニューが出たところで、General setup > Timers subsystem と進みます。

カーネル設定画面-Timer tick handling

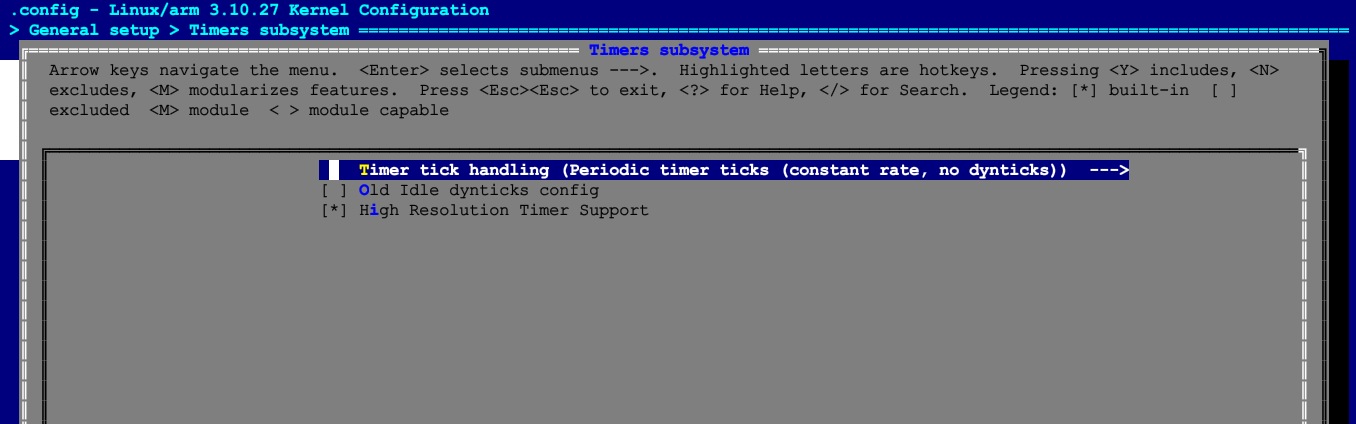
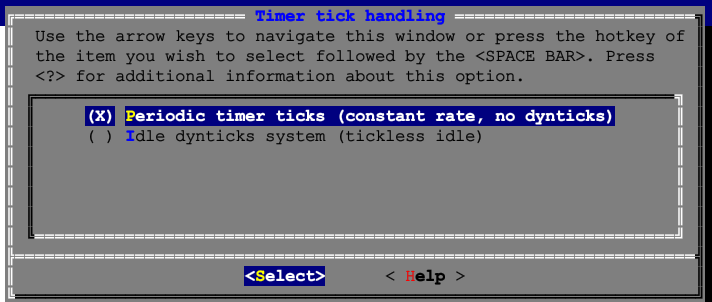
Timer tick handling という項目があるのでさらに進み、Periodic timer ticks (constant rate, no dynticks) にチェックを入れます。

カーネル設定画面-Periodic timer ticks

ひとつ戻って、Old Idle dynticks config のチェックをはずし、High Resolution Timer Supportにチェックをいれます。

さらにひとつ戻って、Device Drivers > PPS Support と進みます。PPS kernel consumer support と PPS client using GPIO にチェックをいれます。

カーネル設定画面-PPS Support
これでOK。あとは前の記事で書いたようにカーネルイメージを作成し、Raspberry Piを再起動します。

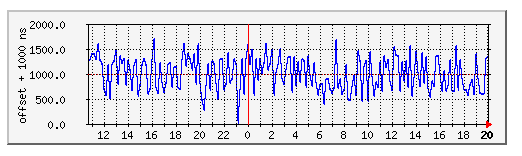
これでしばらくデータを取ってみました。以下のようになりました。1000ns のオフセットをかけてあります。中央の1000のラインが0で下がマイナス、上がプラスです。だいたい±500ns の範囲内に入っています。

カーネル設定後のNTPデータ

まだこの他に、CPUガバナーの設定とシリアル通信のLatency の設定をするとさらに精度があがるそうなので、そちらもやってみます。

PAGE TOP