Customize Consent Preferences

We use cookies to help you navigate efficiently and perform certain functions. You will find detailed information about all cookies under each consent category below.

The cookies that are categorized as "Necessary" are stored on your browser as they are essential for enabling the basic functionalities of the site. ... 

Always Active

Necessary cookies are required to enable the basic features of this site, such as providing secure log-in or adjusting your consent preferences. These cookies do not store any personally identifiable data.

No cookies to display.

Functional cookies help perform certain functionalities like sharing the content of the website on social media platforms, collecting feedback, and other third-party features.

No cookies to display.

Analytical cookies are used to understand how visitors interact with the website. These cookies help provide information on metrics such as the number of visitors, bounce rate, traffic source, etc.

No cookies to display.

Performance cookies are used to understand and analyze the key performance indexes of the website which helps in delivering a better user experience for the visitors.

No cookies to display.

Advertisement cookies are used to provide visitors with customized advertisements based on the pages you visited previously and to analyze the effectiveness of the ad campaigns.

No cookies to display.

CyanogenMod 6 ライトセンサーレベルの設定方法

CyanogenMod 6 で画面の明るさを自動調整に設定した場合、やや暗めの設定になっているようです。これをもう少し明るくしてみました。設定は、CyanogenMod設定→ユーザインタフェース→自動バックライト から行います。

(1)まず、ライトレベルの「カスタム」にチェックを入れます。これで、「他のレベルを編集…」からライトセンサーレベルと画面の明るさを調整できるようになります。
(2)次に、「ライトの減少を許可」にチェックを入れます。こうしないと、一旦、明るい場所で画面が明るくなった後、暗い場所に行っても画面が暗くなりません。
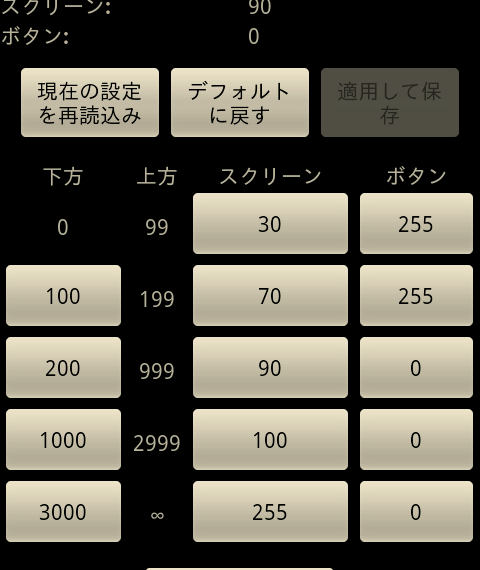
(3)「他のレベルを編集…」からライトセンサーレベルと画面の明るさを設定します。

まず、画面の見方を説明します。画面の上部に現在のセンサー値、スクリーンの明るさ(0-255)、ボタンのバックライトレベル(0-255)が表示されています。センサー値は、ルクスの値です。オフィスだと600ルクスくらい、窓際だと1000ルクスくらい、天気のいい日の屋外だと10000ルクスを超えます。センサー値に フィルタ/生 とありますが、これは後で説明します。

設定方法ですが、センサー値の範囲を設定し、その範囲におけるスクリーンとボタンの明るさレベルを0-255で設定します。画面の例では、センサー値が200ルクス-999ルクスのとき、スクリーンの明るさを90、ボタンのバックライトは非点灯(0)です。

(4)必要に応じて「ヒステリシスを減少させる」の値を設定する。

これが非常にわかりにくい項目で調べるのが大変でした。「ライトの減少を許可」した時に、急激に画面が暗くなるのを防ぐようになっています。そのために(3)で説明したレベル設定でセンサー値のレベルが一区分下がったとしても、スクリーンの明るさレベルを変えない範囲を設定しています。
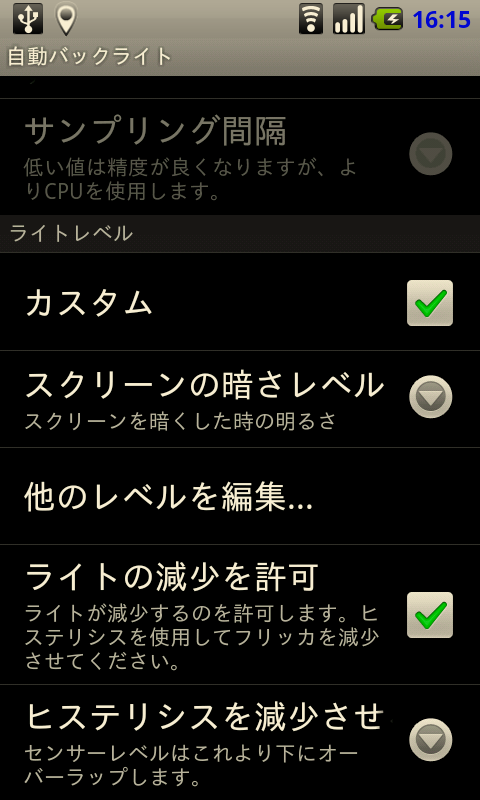
例えば、屋外から室内へ入って、センサーレベルが、10240ルクス から 1280ルクス へ変化したとします。このとき、(3)で説明したレベル設定において、センサー値 10240ルクス が入る範囲から一つ下の範囲に変わるため、スクリーン明るさレベルは255→ 100へ変化するはずです。しかし、元の明るさ(10240ルクス)の一つ下の範囲(1000ルクス-2999ルクス)の上限から、「ヒステリシスを減少させる」の設定値(例えば90%)だけ下がったところ(例えば 90%のとき 2999 – (2999-1000)*90% = 1200ルクスより上)までは明るさレベルを変えません。

したがって、上記の例で「ヒステリシスを減少させる」の設定値が 90%のときは明るさレベルは255のまま、80%のときは(閾値が1400ルクスになるので)明るさレベルは100に変化します。

(5)最後に、必要に応じてライトセンサーフィルタの「有効にする」にチェックをいれ、フィルタを有効にする

このフィルタも急減に画面の明るさがゆらゆらと変わらないようにするための工夫です。「分析窓長」で設定した長さ(例:30秒)での「サンプリング間隔」の設定値ごと(例:1秒)のセンサー値を平均し、センサー値とします。これによりセンサー値が急激に変化しなくなります。
PAGE TOP